Migration, Plugin Framework and Other Significant Changes
- Fortify Software Security Center (SSC) introduces a new approach to its own configuration. The legacy configuration tool existing customers are used to (the Software Security Center Configuration Wizard) has been replaced with a new web interface for configuring, initializing, and migrating the server from within the application.
- SSC now has a separate distribution WAR file for each supported application server instead a single bundle for all.
- SSC 17.20 also introduces a new plugin framework that is designed to run third-party data parsing and bug tracker integrations.
This article describes these changes and provides information about what you need to do to prepare for the 17.20 release.
Special Attention
After you read this article, you should understand the following:
- Fortify has provided a completely new way to configure SSC. The configuration-wizard.jar is no longer distributed with SSC.
- If you have custom bug tracker plugins (developed in-house or via professional services), understand what you need to do to convert them to work within the new plugin framework. You MUST do this before you upgrade to 17.20.
- How to install bug trackers and parser plugins.
- The new fortify.home directory and everything in it.
New Setup Page
Motivation
Fortify replaced the SSC Configuration Wizard in an effort to:
- Do away with the additional, external tool to configure your server.
- Introduce a more modern, easier-to-use interface.
- Store the configuration outside of the SSC WAR. This almost completely eliminates the need to undeploy, modify, and redeploy the SSC WAR file when changes to the configuration are necessary.
- Improve the database seeding experience with Fortify seed bundles during setup.
- Allow SSC to enter a maintenance mode so that teams can still access SSC during upgrades, and see a message that lets them know that an upgrade is in progress.
Comparison of the legacy upgrade method and the new web-based Setup page.
The following screen captures and table show how SSC configuration using the new Setup page compares to configuration using the old configuration wizard.
| SSC Configuration Wizard (external command-line tool) |
New Setup page (web based) |
|---|---|
| Shut down the server until configuration is completed. |
Deploy the new application WAR (the process is the same for new installations and upgrades). |
Run the ssc-configuration-wizard.jar command line java application. |
Open a browser and access <host>:<port>/<appcontext>/init. |
| Point to the new WAR file. | Go through the setup steps to configure SSC. |
| Go through the wizard steps to configure SSC. | Restart the server. |
| Export the configured WAR file. | |
| Restart the server. |

Maintaining State of Setup Process
The new Setup page maintains the states of the different configuration steps. Each step is kept in a temporary state on the server and is only committed after the user clicks Finish on the last step. This means that interruption caused by, for example, closing the browser or timing out does not restart the process.
Behind the scenes
fortify.home
The new Setup page introduces the concept of a root directory of configuration for Fortify applications.
The default value, <user.home>/.fortify, can be changed by setting the fortify.home system property as follows:
-Dfortify.home=/an/absolute/path
For Tomcat, this can be passed by setting JAVA_OPTS or CATALINA_OPTS with the fortify.home property.
Application home is the relative path inside of fortify.home. The path is based on the application context in which SSC is deployed in the application server (<fortify.home>/<appcontext>). For example, for an SSC instance deployed in the <host>:<port>/ssc context, the setup page creates the path <fortify.home>/ssc. For an SSC instance deployed at the root context, the path created is <fortify.home>/ssc@root.
fortify.home directory structure
   <fortify.home>/
      <appcontext>/
         conf/
            app.properties
            datasource.properties
            log4j2.xml
            version.properties
         logs/
            ssc.log
         init.token
         plugin-framework/
         ...
      fortify.license
Where
log4j2.xmlis the log configuration, which you can now change on the fly. See section below.init.tokenrepresents a new security token that is generated each time the Setup page application is loaded (start of server in configuration mode). The user who configures SSC uses this token to access the Setup page at the<host>:<port>/initURL.app.propertiesis a file that contains the application properties that the customer can configure (extracted from ssc.properties).datasource.propertiesis a file that contains the database connection properties.version.propertiesis a file that stores current and previous version of SSC for application upgrade purposes.plugin-frameworkis the new plugin framework configuration and temporary storage (internal).fortify.licenseis the license file for SSC.
Logs
SSC log locations in previous versions depended on the application server and had the limitation that multiple SSC applications on the same server wrote to the same log. By default, SSC now sets the com.fortify.ssc.logPath system property to <fortify.home>/<appcontext>/logs/. You can override the default location with the -Dcom.fortify.ssc.logPath JVM argument.
Distribution changes
SSC is now distributed in application server-specific installation bundles, instead of the single bundle for all application servers. This means users no longer have to configure specific dependencies for different types of application servers. Each distribution is now pre-configured with the correct JAR dependencies.
JDBC driver
With the 17.20 release, you must place the JDBC driver in the classpath of the application server so that it can be loaded. For information about how to place the library on the classpath of the web application server, see the HPE Security Fortify Software Security Center User Guide.
For example: On Tomcat, copy your JDBC driver to $CATALINA_HOME/lib or the /WEB-INF/lib directory of SSC. You can see the list of JDBC drivers loaded in the application server on the Setup page. Although Fortify does not recommend it, in special cases you can still manually insert the JDBC driver into the WAR file ahead of SSC deployment.
Plugin Framework
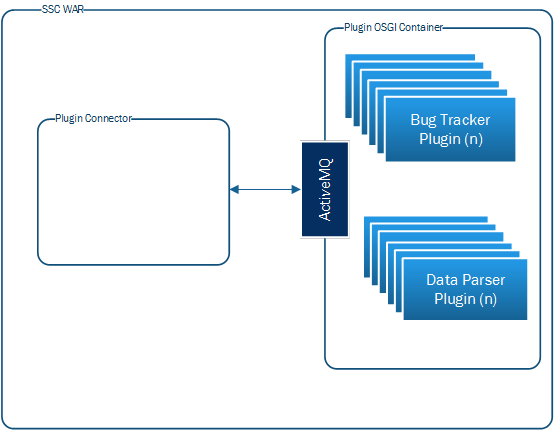
The 17.20 release introduces a new plugin framework to support a growing ecosystem of integrations. The framework supports running third-party parser plugins, bug tracker plugins, and is designed with the core goals of isolation, granularity, and reliability in mind.
Isolation
Each plugin defines and wraps its own dependencies inside of its bundle. The framework will take care of dependency isolation from the rest of the SSC loaded libraries.
Granularity
The framework supports different kinds of plugins to perform different operations in SSC. It is agnostic to the type of implementation the plugin needs. In the 17.20 version, data parsers and bug trackers are supported, and in future versions Fortify intends to support more.
Reliability
The framework is built with a robust and reliable messaging mechanism to ensure data integrity.

Some Internals:
- Felix OSGi container - used internally but transparent to plugin implementation. Framework converts the plugin to an OSGi bundle.
- Camel framework + ActiveMQ - messaging between the framework and SSC.
Third-Party Parser plugins
Parser plugins went through a major rewrite. They are now bundled with:
- “Instructions” for SSC on the fields that are to be created.
- A view template to tell SSC how to show these fields.
- The logic to map data from third-party file exports to these fields provided with bundles.
Plugin Dependecies Note:
If a plugin has any dependencies on javaEE packages, the plugin developer must bundle the necessary javaEE jars into the plugin’s own library path, and must not rely on these packages being available from the JRE. The JavaEE modules have been removed from current versions of Java post-Java8 in SSC 18.20.
Such packages include JAXB api and implementation, javax.activation, javax.annotation, javax.transaction, javax.xml.ws, and CORBA-related packages.”
In particular, the “Bundle-ClassPath” of their plugin bundle manifest should include the dependency javaEE jars and the jars themselves must be stored inside the bundle (typically in a “libs” folder along with any other libraries their plugin depends on).
Bug tracker
You might be familiar with the bug tracker plugins SSC supplies, such as the JIRA plugin. These plugins where previously distributed inside the WAR file. During configuration, you would remove any unneeded plugins. That legacy process has been removed.
SSC’s existing bug tracker plugins have been migrated to run in the new plugin framework.
Bug tracker installation is now much simpler and friendlier. Default Fortify bug tracker plugins are bundled with the SSC distribution ZIP file. They are not preloaded into the application.
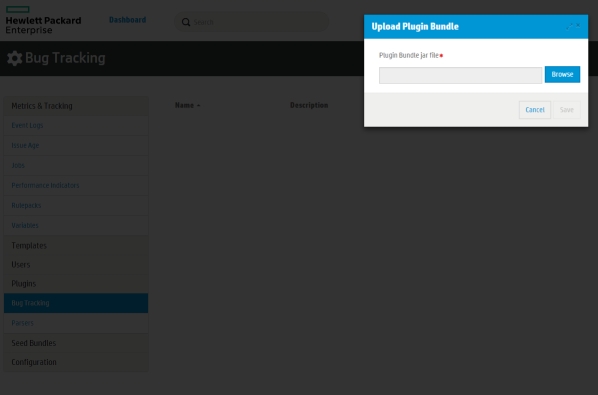
To enable bug tracker integration after SSC 17.20 deployment, you (an Admin user) simply go to the Administration view in SSC and then navigate to the Plugins section to upload the required plugins. You can now manage plugins via the user interface without manual intervention inside the WAR.

Bug Tracker Special Attention
Due to the migration of the bug tracker plugins to the new plugin framework, each bug tracker is built in a new way. The most significant outcome of the new build process is that the plugins are self-contained. That is, each contains all of its dependencies.
This means no more dependency collisions with SSC!
However, if you have a custom bug tracker plugin (not part of the default bundle that comes with SSC), you must migrate them to the new build method before you upgrade to 17.20.
Migrating Custom Bug Trackers
Before starting, make sure that you test your custom bug tracker plugins in an environment other than the production environment. Fortify recommends that you set up a fresh local instance of SSC for migrating and testing your migrated custom plugins.
- Inside the SSC distribution WAR, locate the sample folder for the bug tracker plugins.
- Follow the instructions in the README file to adapt your custom bug tracker plugin to the new build method.
- To verify that your newly upgraded plugin works as expected: a. Navigate to the Administration view in SSC. In the left panel, select Plugins, and then select Bug Trackers. b. Make sure you can add and remove and enable and disable your migrated plugin without errors. c. Leave it in the enabled state for the subsequent steps. d. Create a test application version. e. Open the Audit page for your application version, click Profile, select the Bug Tracker tab, and then configure the application version to use your migrated bug tracker plugin. f. Load an FPR so that you have some issues you can test with. g. Submit bugs by using single and multiple submission mode. h. Verify created bugs in the bug tracker and test their deep links.
- Your plugin should now be ready for production use. After you migrate your target instance of SSC (staging / production), follow step 3 on that instance of SSC.
Automating SSC configuration
In some cases, you may want to automate SSC configuration before deployment. The ssc-configuration-wizard.jar had command-line switches to achieve that. In the past, the main use case would have been to configure the WAR file on systems that do not have a graphical user interface. With the new Setup page, you can configure SSC from any machine through a web browser.
For any other workflow, automating configuration is very simple. You can just change the files in fortify.home. In addition, SSC 17.20 introduces a new autoconfig file.
<appcontext>.autoconfig
This is a YAML file that includes sections for each of the areas you can configure in SSC. The application picks this file up at the application boot and automates the whole installation. All wizard steps except for the database migration step, can be automated using the autoconfig file. The application picks this file up at the application boot and automates the whole installation! In a nutshell, all steps of the wizard except database migration, can be automated using the autoconfig file.